Description:
This is hands down one of my favorite hikes/caves that I’ve ever done. The hike to the cave is a about 5.2 miles round trip. The first time I did this hike, we greatly underestimated the distance and amount of time the hike would take. I would start mid-morning and expect to come back mid-to-late afternoon. Take plenty of water and snacks. August or September is the best time to do this hike. Going in June, you’ll most likely encounter snow, and you won’t be able to go too far. Mid-to-late October is the absolutely latest I would recommend this hike. The drive to the trailhead from Rexburg is about an hour and a half. Then, plan to spend around six total hours hiking and playing around the waterfall and cave.
The cave opens up rather large, but in places you really have to squeeze through so don’t eat too many twinkies before going. I would recommend bringing a pair of pants and a sweatshirt to put on once you’ve arrived to the cave, as it’ll be cold, and you’ll also have to crawl on rocks in some places. You can only go so far into the cave without proper rapelling equipment. At some places, it gets VERY tight (such as army crawling for a 30-foot stretch), and it may not be ideal for those who get claustrophobic easy.
The hike begins out flat and smooth. A short distance into the hike, you’ll come to a bridge that takes you over a stream. The bridge is a fairly-new addition, as you used to have to cross logs. As you continue hiking, you’ll be enveloped in beautiful green scenery. You’ll see large boulders and entire cliff-sides that have fallen off the mountain, and line the river. You’ll soon begin climbing through switchbacks that take you into the main canyon. The trail gets steeper (although not unbearable), as you climb up the left side of the canyon. You’ll definitely want to bring your camera, as some of the views are breathtaking.
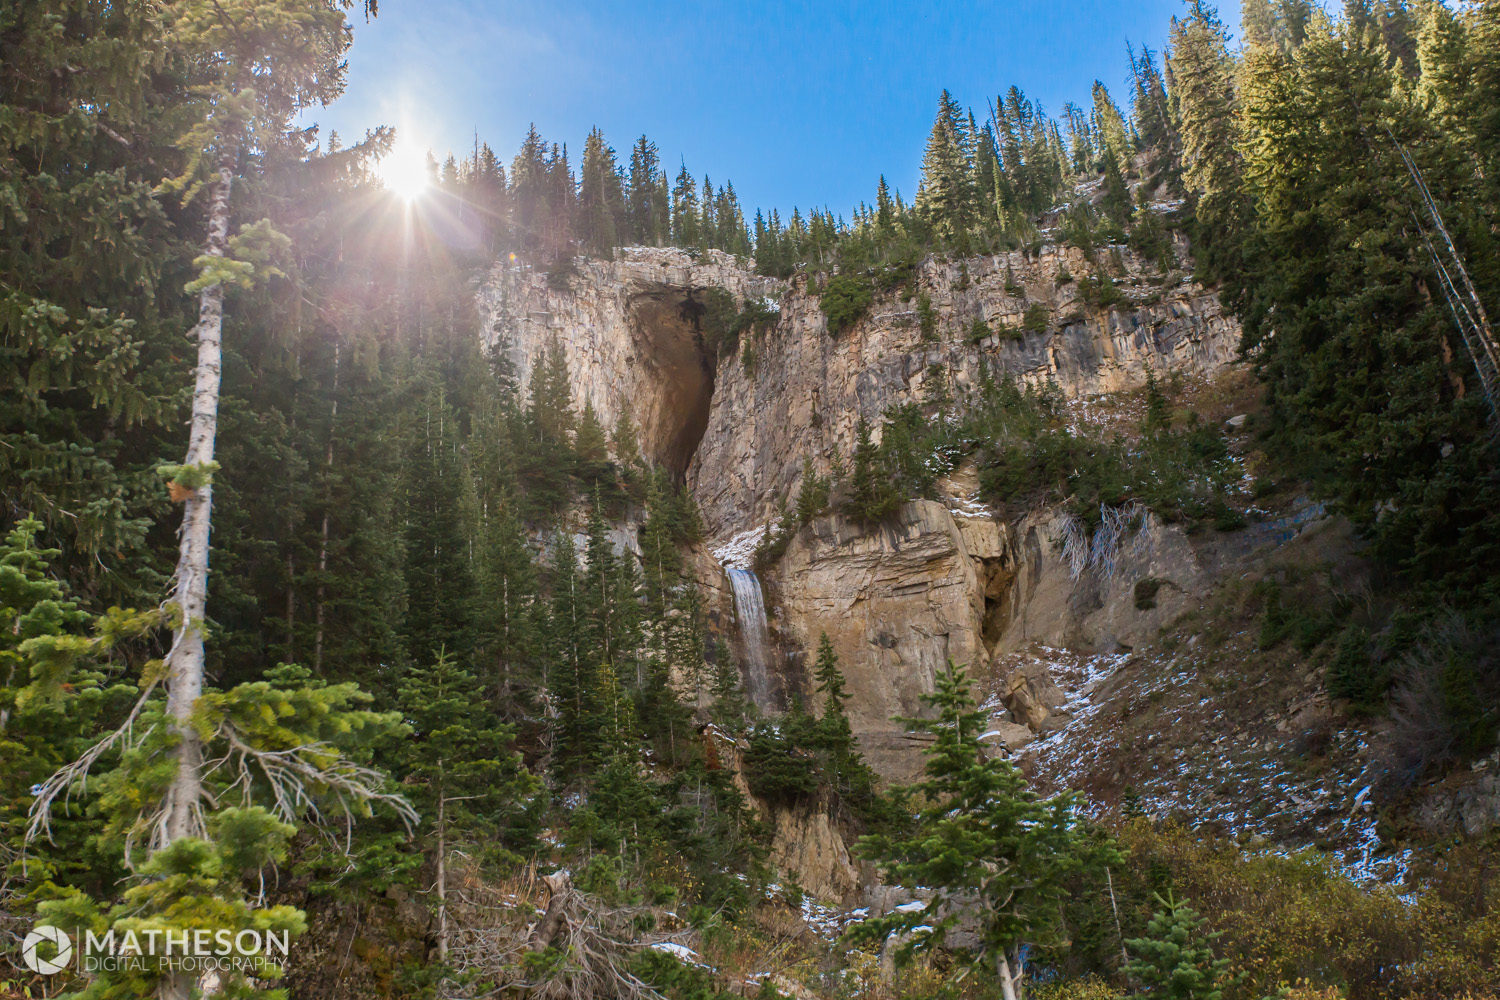
Near the half-way point of the hike, you’ll finally be able to see the cave across the canyon on the right side, high in the cliff wall. It’s hard to see at first, but it almost looks like an elongated upside-down triangle, a long slit in the hillside. At this point, it’s hard to believe you’ll be that far away eventually, but you get there quicker than you think. Depending on the time of year that you go (late summer is best), about halfway between where you currently are and the cave opening, you’ll come across a smaller waterfall where you can get a drink and take some photos.
As you get closer to the cave, the trail gets steeper. This is undoubtedly the most difficult part of the hike. You’ll begin to climb with short and choppy switchbacks. Soon, you’ll come up over a little hill, and you can hike down a short distance to the base of the waterfall. The waterfall is at least thirty feet up. Many walk through it, but the water is glacier cold, and the weight/pressure from the water gives a good sting.
Continuing up the trail, you begin the ascend up to the cave opening itself. Rocks are placed in such a way that they seem like stairs were purposely built that way. You’ll come around a corner and see a large stream of water violently spewing from the cave’s mouth. You may want to take a few empty bottles with you. The water coming from the cave is cold, pure and the best tasting mountain water you will ever drink. I always like to bottle as much as I can carry and take it home.
Depending on the time of year, the river can be quite violent. Other times it can be much more tranquil. We went at the beginning of October, and the water was much slower and gentle than I’d seen it in the dead of summer. Climbing up the left side of the waterfall, you’ll come to a point where you want to cross the river. There’s a place you can cross where the water is fairly shallow, and there is a bed of rocks that have been arranged to be relatively flat. Obviously, the rocks are slick, so watch your footing. I wouldn’t recommend that small children attempt this.
Hugging the right side of the wall, you’ll make your way into the cave. Fallen rocks cover the entire cave floor, and the river soon disappears underneath your feet. Dry ground covers the cave at this point. If you’re going to go deep into the cave, you’ll need a light of some kind. A headlamp is recommended, but we just used the light from our phones. Once inside the cave, the path widens and narrows drastically until you come to a small hole just a few feet in diameter. There’s a reason this is called the “Wind Cave”. Coming through the small whole is a big gust of wind. This means a lot of frigid air on wet clothes. For most people, you’re only able to go so far. For those who are more daring, you’ll need rope, lights, and repelling equipment to make it farther through the rest of the cave.
Directions:
From Rexburg, head north on Highway 20, as if you’re driving towards St. Anthony. Then, take Exit 339 towards Driggs and Jackson. After arriving into Driggs, the turnoff is about 2-3 miles further down the road. You’re going to take a left turn 3/4 of a mile past the Spud Drive-in Theater (you’ll see a giant potato sitting on a flat-bed trailer), onto 3000 S. If you’re using Google for directions, it will tell you to take a left onto “W 300 S”, but the actual street sign says 3000 S. Follow the road straight, and it’ll soon turn into a gravel road. When the road comes to a “T”, turn right. Follow the road for two miles until you come to a fork in the road. Take the left fork, and then follow the road for 2.5 more miles. If you take the right fork, it will take you to a girl’s scout camp. At the end of the 2.5 miles, you’ll come to the parking lot. Park, and walk up to the trailhead.
Trailhead GPS Coordinates:
Latitude: 43° 41′ 11.706″ N
Longitude: 110° 58′ 7.596″ W
Cave GPS Coordinates:
Latitude: 43° 39′ 57.684″ N
Longitude: 110° 57′ 21.474″ W
Photos:


Leave a Reply